How to Test Moisture in Concrete Floors
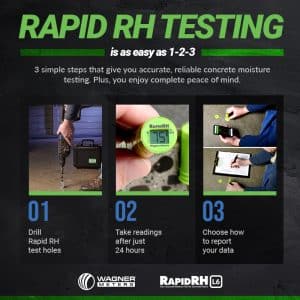
For flooring professionals, nothing is more frustrating than a failed installation caused by hidden moisture in concrete slabs. Adhesive breakdown, warping, bubbling, and costly rework can all be traced back to inadequate moisture testing before the floor covering is installed.
But with so many testing methods available, how do you ensure you’re using the best approach to protect your work and your reputation?
This guide provides a practical, step-by-step approach to testing moisture in concrete floors, helping you:
✔️ Understand the key differences between testing methods (ASTM F2170 RH testing vs. ASTM F1869 Calcium Chloride test)
✔️ Follow best practices for placing and reading moisture sensors
✔️ Ensure compliance with manufacturer specifications to avoid flooring failures
✔️ Use the right tools—from rapid RH sensors to concrete moisture meters—for accurate, reliable results
By using industry-backed moisture testing techniques, you eliminate guesswork and ensure every flooring installation is built to last.
💡 Get it right the first time—because a successful floor starts with accurate moisture testing.
Table of Contents
- ASTM F1869: Calcium Chloride Test
- ASTM F2170: In Situ Relative Humidity Testing
- How to Test Moisture in Concrete Floors
- What is an Acceptable Moisture Level in Concrete
- What are Concrete Moisture Testing Tools, and Why Do I Need Them?
- 3 Tips for Concrete Moisture Testing in the Real World
By the end of this article, you’ll be equipped with the knowledge to confidently navigate the world of concrete moisture testing and avoid costly mistakes.
So, let’s dive in and demystify the process of testing moisture in concrete floors together!
ASTM F1869: Calcium Chloride Test
Before we start, let’s debunk this idea: the calcium chloride (CaCl) testing method is sufficient for moisture testing. No, it is not.
The CaCl method (standardized today as ASTM F1869) was first established in the 1940s with no real basis in scientific research. Since it only measures the slab’s surface, you’re not getting an accurate forecasting picture.
It tells you what’s happening now on the surface, but as a general contractor or flooring contractor, your job’s success is based on what happens in the future—after you lay the flooring.
The in situ relative humidity (RH) test method must be used to get this information.
Here’s why:
When the concrete is still drying, moisture levels on the surface read lower than in the center of the slab. But when you seal your concrete and lay the flooring, the moisture inside the slab will equilibrate (disperse evenly). This means the moisture hidden below could rise toward the top and damage your hard work.
To avoid guessing how much moisture is actually in the concrete slab, you should use RH testing, which reads deeper in the concrete than the CaCl method.
Scientific research determined that testing at 40% of the slab’s depth for concrete drying from one side (20% if drying from two sides) would best predict the final slab RH levels—if it were sealed by a low permeable material then.
Knowing the accurate RH level of the slab can prevent potential moisture-related flooring failure.
Before testing, your space should be enclosed with the HVAC up and running.
ASTM F2170: In Situ Relative Humidity Testing
The ASTM F2170 standard outlines the methodology for in situ relative humidity (RH) testing in concrete slabs. This method is considered the most reliable for determining moisture levels deep within the slab, providing a much clearer picture of long-term moisture behavior, especially as the concrete equilibrates.
Relative humidity testing involves drilling into the concrete and placing probes at a depth of 40% of the slab’s thickness (for slabs drying from one side). The sensors remain in the slab for a minimum of 24 hours to achieve moisture equilibration, after which the RH levels can be accurately measured.
Why Choose ASTM F2170 Over Other Methods?
Unlike surface-level tests like the Calcium Chloride method (ASTM F1869), which only measure moisture at the top of the slab, ASTM F2170 probes deeper, reflecting the moisture levels throughout the slab. This depth reading is essential for predicting how the moisture will behave after the floor covering is installed.
ASTM F2170 is a critical step in ensuring the longevity and performance of your concrete flooring system. Understanding the RH levels within the slab helps prevent costly moisture-related failures after flooring installation.
How to Test Moisture in Concrete Floors
1. Install Smart Logger and Log 48 Hours Before Testing
Use one per zone of conditioned space where concrete will be tested.
2. Use Concrete Moisture Meter to Identify Areas with the Highest Comparative Moisture
Use only on smooth surfaces.
Note: Do not use alone as it only measures the top, “drier” part of the slab
3. ASTM F2170: Install Rapid RH L6 Smart Sensors
- Use a hammer drill and masonry drill bit to drill holes at 40% depth in concrete if drying from one side.
- Use a wire brush, vacuum, and attachment to clean out holes.
- Place the required number of sensors targeting areas with the highest moisture levels over the rest of the concrete slab. Place at least three sensors for the first 1,000 sq. ft. and one more per additional 1,000 sq. ft.
4. Use the DataMaster L6 app to Create a Map of Sensor Locations
Upload your floor plans and easily add sensor locations on the map. Name each sensor to keep an accurate record of the data for each sensor.
5. Transfer Data from RH Sensor
Use the DataGrabber with Bluetooth to easily get your sensor data to your phone. Otherwise, use the Total Reader to transfer your RH readings to the DataMaster L6 app.
6. Analyze Data and Determine What the Concrete Slab Needs
The concrete slab might need additional drying time. Should you need to take repeat readings, you can do so immediately. The Smart Logger, DataGrabbers, and L6 sensors will continue to operate and store data for months.
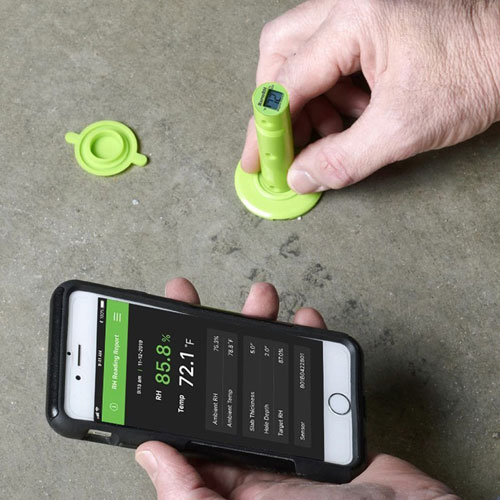
The Rapid RH Total Reader is a handy device that can wirelessly transfer your RH data to the DataMaster L6 app on your smartphone.
What is an Acceptable Moisture Level in Concrete?
The ASTM F2170 standard says the concrete slab needs to be below 75% relative humidity, or whatever RH level the floor covering manufacturer specifies. Some products can handle 80% RH, and some even up to 90%.
Once you get your readings, it’s time to make the call on whether or not to proceed with installing the floor covering.
Check the floor covering manufacturer’s website for specifics on RH levels, or visit www.rhspec.com for a list of most products with links to the manufacturer website.
The patented Rapid RH® Smart Sensor design is superior to other RH test methods. For one, the Rapid RH L6 single-use sensor is permanently embedded into the concrete, making it easy to obtain fast, accurate RH readings consistent with ASTM F2170 and drastically cutting down on otherwise required paperwork and regular calibration checks.
Tools for Concrete Moisture Testing
Rapid RH L6
The Rapid RH L6 Smart Sensors is in situ concrete testing probes that are highly accurate and fully comply with F2170.
These sensors come factory calibrated with a NIST-traceable certificate of calibration and never need recalibration.
Their advanced technology means easier testing and faster results. The Smart Sensors go 40% into the concrete slab, and each sensor needs 24 hours of equilibration time. After they’re installed, there’s no need to transfer them and no need for additional equilibration time. Repeat readings can be taken easily—no extra time or effort is required.
All Rapid RH L6 Smart Sensors come with an ASTM F2170 test results sheet. This sheet gives documentation of the required data: floor map of the sensor location, sensor recording, depth, and dates and times of RH readings. Download this form here.
If you want the full version—including an ASTM F2170 checklist—download this one.
Concrete Moisture Meter
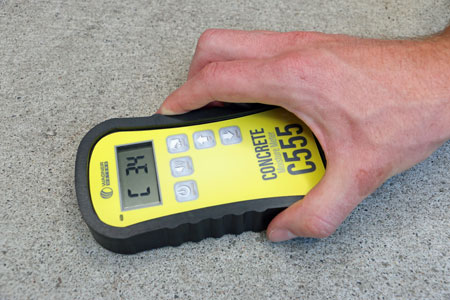
A good way to find where to put in situ probes is by using the C555 concrete moisture meter.
In compliance with ASTM F2659, the C555 concrete meter measures concrete moisture in seconds. Its built-in sensors also take measurements of ambient temperature and RH.
When placed on the smooth, flat surface of the slab, the C555 provides fast, non-destructive “wet/dry” qualitative moisture measurements. These measurements show where potential problem areas are, giving you a good indication of where to install the Rapid RH L6 Smart Sensors.
Smart Logger
When the concrete slab is enclosed with a running HVAC, it’s time to install your Smart Logger.
The Smart Logger requires very little setup. Since it’s small and needs no power connection, it can be placed anywhere (use one in each area of differing ambient conditions).
Once set up, the Smart Logger starts taking ambient temperature and RH measurements on a pre-programmed schedule. Allow 48 hours of logging time to show correct, stable ambient conditions. Up to 12,000 recordings can be stored on the device and easily accessed through the Smart Logger app.
The free Smart Logger app is available for any IOS or Android device. Access your recordings via Bluetooth® with the option to generate, print, and email PDF reports of the readings.
When the logger shows favorable conditions have been in place for 48 hours, it’s time to determine where to place the in situ probes.

Free Download – 4 Reasons Why Your Concrete Is Taking Forever to Dry
3 Tips for Concrete Moisture Testing in the Real World
#1. You Can’t Just Follow the Instructions
This one surprised us a bit. In situ RH testing is not rocket science. And yet, people cited poor training or execution as a key issue. One aspect of this is making sure that testing is done consistently and correctly every time.
For example, always making sure the right number of RH probes are placed in the concrete for the square footage being tested.
However, the issue really went deeper than this. Some people described their challenge in finding people who have the right training to perform RH testing so they have the assurance of getting accurate, reliable results.
Again, this is not to say RH testing is difficult. It is not. The methodology is easy enough that anybody can do it. But at the same time, there are important things to know to do it right.
#2. Look at the World Around You, and Be Sure to Check Under the Hood
People responded about how important it is to pay attention to the ambient conditions where the testing is happening. ASTM F2170 requires conducting the test at service conditions. This refers to the ambient conditions that people will experience inside the building once it is placed into service.
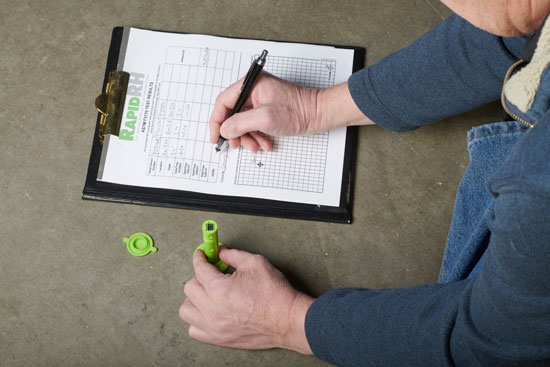
With the Rapid RH system, you can use either the ASTM F2170 test results sheet or a digital app for recording all your RH data.
Testing at anything other than service conditions will mess with your results. The job site must be given time to acclimate per ASTM F2170.
Another key issue people raised was the “cleanliness” of the test hole itself – in other words, making sure the hole is not dusty and there’s no silica in the air to skew readings.
#3. Know the Limits of Your Test
ASTM F2170 requires the use of RH sensors that are calibrated within +/- 2% between 50 to 90% RH, which begs the question: How accurate is accurate?
The fingers will start pointing in all directions if a flooring failure occurs, but what more can anyone do, but be diligent in following the standard and properly executing the RH test.
So in spite of the above considerations encountered in the real world, we can minimize the risk of failure by taking the right action. And the RH test has a scientific pedigree that no other industry-accepted method for testing concrete moisture can offer.
Its proven reliability and ease of use are why the RH test has rapidly grown to become the #1 moisture test for assessing the readiness of concrete slabs for flooring installations.
This provides you with the highest data integrity and lets you sleep easy knowing you’re covered.
In the ever-evolving realm of construction, understanding the intricacies of concrete moisture is paramount. Armed with the proper knowledge, tools, and techniques, you can sidestep potential pitfalls and guarantee the longevity and safety of your flooring installations.
This guide, meticulously curated by the experts at Wagner Meters, is not just about methodologies—it’s about instilling confidence and ensuring excellence in every project.
The importance of accurate moisture testing in concrete cannot be emphasized enough. With the Rapid RH system, Wagner Meters offers an unparalleled solution that marries precision with ease of use. As you embark on your next project, remember that the foundation of every successful build is not just concrete but the expertise and diligence behind its preparation.
Wagner Meters is always at your service for any queries, tool acquisitions, or to dive deeper into the world of concrete moisture testing. We don’t just offer tools; we provide peace of mind. Remember, a solid foundation today ensures a steadfast tomorrow. Happy building!
To purchase the tools necessary for accurate concrete moisture testing, visit the online Rapid RH store. For more information about RH testing or any of the Rapid RH L6 system tools, call the Rapid RH specialists at Wagner Meters. Available worldwide toll-free at 800-933-3506.
Learn the difference with moisture testing for residential and commercial flooring.
Download the Rapid RH ASTM F2170 Checklist – Ensure Accurate RH Testing Every Time!
Jason has 20+ years’ experience in sales and sales management in a spectrum of industries and has successfully launched a variety of products to the market, including the original Rapid RH® concrete moisture tests. He currently works with Wagner Meters as our Rapid RH® product sales manager.
Last updated on April 2nd, 2025




Jason, I just purchased and used the RHL6. I have 2 questions
1) When I did an initial 1-hr read, the meter showed the RH of 77 and slab temp showed ‘H’, no number – what does that mean?
2) Where do I get the blank ‘ASTM F2170 Test Results’ sheets that have the RapidRH header?
Rick:
Thanks for the questions. The “H” would typically be a miscommunication between the reader and the sensor plate. I would expect it to clear out the next reading. Please let me know if you see additional issues. The test result page can be found at Rev C- L6 RRH Floor Map revised 05-07-19 (https://www.wagnermeters.com/pdf/RRHL6-floor-map.pdf). Good luck.